
How to Prevent Fence Posts From Rotting in 2026
A strong fence is only as good as its foundation—the posts holding it up. But when a fence starts to fail, leaning or wobbling after just a few years, the problem almost always starts underground. The culprit is rot, a quiet but relentless process of decay.
To put it simply, fence post rot is a breakdown of the wood caused by a simple but destructive combination: wood, moisture, and oxygen.
This mix is the perfect environment for the decay-causing fungi that live in all soil. Here in Connecticut, our climate can make things worse. The state’s often damp, heavy clay soils, especially in places like Hartford County, are known for trapping water and holding it right against the wood. When you add our cycles of freezing and thawing, you have the perfect conditions for decay.
The Ground Line: Where the Real Damage Happens
The most critical, and by far the most vulnerable, area of any fence post is the first six inches below the ground. Think of it as the danger zone.
In this specific section, both moisture from the soil and oxygen from the air are plentiful. This allows fungi to thrive and eat away at the wood fibers. A post can look perfectly solid from your side of the yard while its underground support is slowly turning into a sponge.
This is why even pressure-treated wood, which is infused with chemical preservatives, isn't foolproof. It’s a huge step up from untreated wood, but that protection can weaken over time, especially when it’s constantly sitting in damp soil.
Studies show that up to 70% of pressure-treated post failures are due to direct soil contact and poor drainage. This one factor can reduce a fence's lifespan from a potential 20-40 years to as little as 7-10 years, a common story in the moist clays of Connecticut.
For example, one long-term field study highlighted that while treated posts performed well, adding a simple protective barrier—like a post sleeve—boosted post soundness to an incredible 95% after two decades. It’s clear that just setting a post in the ground isn't enough; you need a proactive strategy. You can discover more insights on how even treated wood needs extra protection to last.
Stopping rot isn’t about finding a single solution. It’s about building a layered defense that starts long before the post ever touches the dirt. By understanding what causes decay, you can implement the right methods to turn a potential 7-year failure into a 25-year success story for your property.
Choosing the Right Materials for Rot Resistance
Before you even think about digging a post hole, your most important decision is choosing the right materials. The wood you choose will have the single biggest impact on how long your fence lasts, especially here in Connecticut with our damp seasons.
Getting this choice right from the start is the difference between a fence that looks great for a few years and one that stands strong for a generation.
Decoding Pressure-Treated Lumber Ratings
When you’re looking at pressure-treated wood, it’s easy to assume it’s all the same. It isn’t. The key is to look for its Use Category (UC) rating, a simple code that tells you exactly what that piece of lumber was treated to handle.
For any post that is going into the ground, this part is essential. You must use wood rated UC4A or higher.
- UC4A (Ground Contact): This is your standard for general use. It's properly treated to withstand the constant moisture and microorganisms in the soil. For most residential fences in Connecticut, UC4A is the minimum you should accept.
- UC4B (Heavy-Duty Ground Contact): Think of this as the next level of protection. If your property has known drainage issues, sits in a low-lying or swampy area, or the fence is a critical retaining structure, upgrading to UC4B provides an extra margin of safety against rot.
Be careful at the lumber yard. A post rated for above-ground use, like UC3B, might look identical but has far less chemical preservative. If you put it in the ground, you’re setting it up to fail. Expect to see significant rot within just 2 to 3 years.
Naturally Rot-Resistant Woods vs. Pressure-Treated Pine
While properly rated pressure-treated pine is a reliable choice, some wood species come with their own built-in defenses.
Cedar is a classic choice for a reason. It contains natural oils that ward off moisture and insects, making it a beautiful and durable option. We often recommend it for its stability and timeless look. You can find more details in our complete guide to cedar fencing.
Another excellent, though less common, option is Black Locust. This is an incredibly dense and resilient hardwood, often considered one of North America's most rot-resistant woods. It's not unheard of for untreated Black Locust posts to last 50 years or more in the ground. That durability comes at a higher cost, as it’s often harder to find.
To help you decide, here’s a quick comparison of the most common wood post materials we see in Connecticut.
Wood Fence Post Material Comparison Longevity and Cost
| Wood Type | Treatment Level | Estimated Lifespan (Ground Contact) | Relative Cost |
|---|---|---|---|
| Pressure-Treated Pine | UC4A | 15-20 Years | $$ |
| Pressure-Treated Pine | UC4B | 20-25+ Years | $$ |
| Western Red Cedar | Untreated | 15-25 Years | $$$ |
| Black Locust | Untreated | 30-50+ Years | $$$$ |
Ultimately, the choice between treated pine and a naturally resistant wood like cedar comes down to balancing your budget with your desire for longevity and appearance.

As you can see, the jump from an untreated post to a treated one is massive. But taking extra steps to protect the post can extend its life even further.
Modern Alternatives That Eliminate Rot Entirely
Of course, the surest way to prevent wood rot is to not use wood at all. For clients who want a true "set it and forget it" solution, modern materials are the answer.
High-quality vinyl and ornamental aluminum fences make rot a complete non-issue. Because these materials are not affected by moisture, fungus, and insects, the posts simply cannot decay.
This makes them an ideal choice for properties with consistently wet soil, fence lines that get hit by sprinklers, or for anyone who values a maintenance-free investment. The initial cost is higher than wood, but when you factor in the money and hassle saved on future repairs and replacements, the lifetime value is outstanding.
Getting the Installation Right: The Foundation of a Long-Lasting Fence
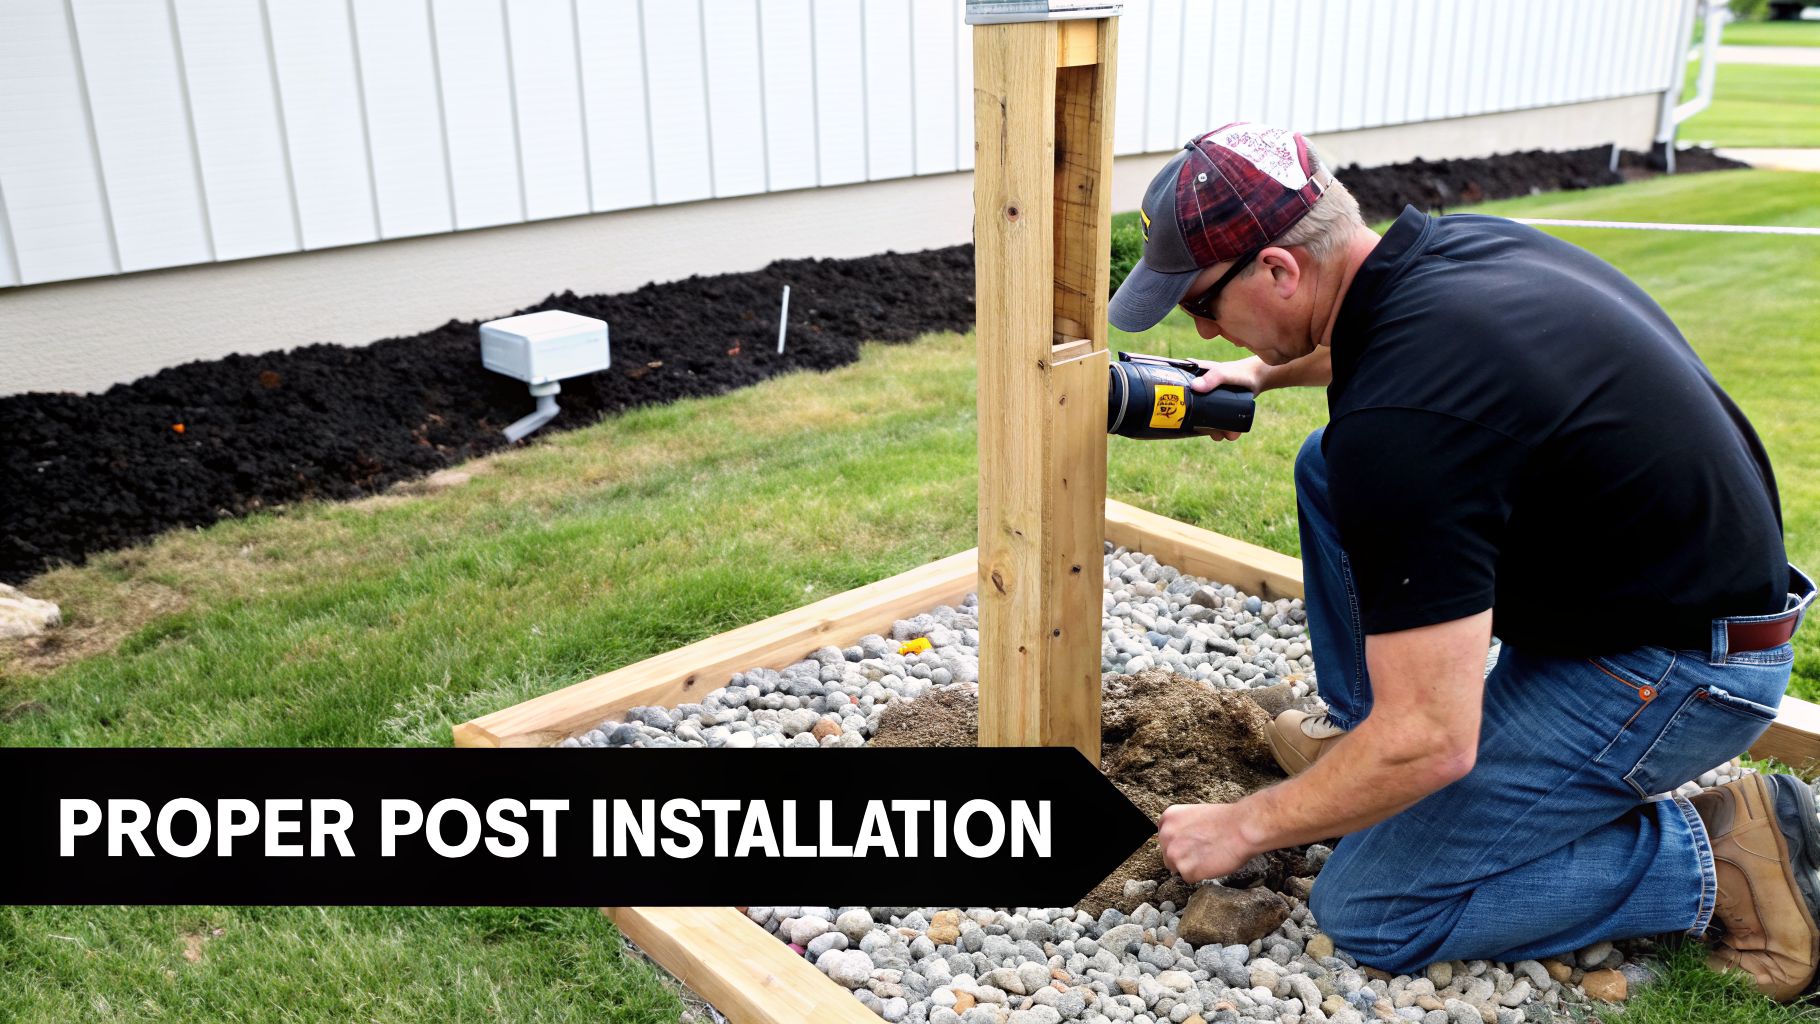
You can choose the best pressure-treated lumber on the market, but if the posts are set incorrectly, they're still going to rot. The way a post goes into the ground is just as critical as the wood it's made from. A professional installation isn't just about making the fence look straight—it's about building a defense against moisture from day one.
From how deep you dig to what you pack around the post, every detail matters. Getting these basics right is what makes the difference between a fence that lasts for decades and one that starts failing in just a few years.
Digging Below the Frost Line
Here in Connecticut, our winters are tough on fences. As the ground freezes and thaws, it can push posts right out of the ground. This constant shifting doesn't just make your fence crooked; it loosens the footing and creates new paths for water to seep in and start the rotting process.
The only way to fight this is to dig your post holes below the local frost line—the depth at which the soil no longer freezes. Across most of Connecticut, including areas like Hartford and Tolland counties, you need to go down at least 36 to 42 inches.
By setting the post base in stable, unfrozen soil, you anchor it against the force of freezing ground. It’s an essential step for any fence that’s meant to last.
The Gravel vs. Concrete Debate
One of the biggest questions we hear is whether it's better to set posts in gravel or concrete. For preventing rot, the answer comes down to one simple principle: water needs a place to go.
A common DIY mistake is to sink the entire bottom of a post into a solid block of concrete. While it feels very solid at first, this method actually creates a small basin around the wood. Moisture will inevitably find its way between the post and the concrete, get trapped, and create a perfect, perpetually damp environment for rot.
From our experience, a gravel base is the superior method for maximizing the life of a wooden post. We've found that placing a 6 to 8-inch layer of compacted crushed stone at the bottom of the hole creates an essential drainage field. This allows water to drain away from the vulnerable end grain of the post, which can extend its life by up to 40%.
Properly preparing the ground is a universal principle for anything that needs to be Built to Last. The same logic of ensuring solid anchoring and excellent drainage applies to all sorts of construction projects.
Best Practices for Setting Posts
Once the hole is dug, your setting technique is what secures that longevity. Here’s a look at how the pros do it to stop fence post rot before it starts.
The Gravel-Set Method:
- Start by adding 6-8 inches of 3/4" crushed gravel to the bottom of the hole.
- Use a tamping bar to compact this layer until it's firm. This is your drainage base.
- Set your post in the center, using a level to make sure it’s perfectly plumb (that’s perfectly vertical).
- Continue adding gravel in 6-inch layers, tamping each layer down hard all around the post until the hole is completely full.
This technique grips the post tightly while guaranteeing that water can never pool around its base.
The Hybrid Concrete-Set Method:
Sometimes, you really need the extra strength of concrete, especially for gate posts holding heavy weight or in particularly loose soil. The key is to use it strategically, not as a water trap.
- First, always install that crucial 6-8 inches of compacted gravel at the bottom for drainage. Never skip this.
- Place the post on top of the gravel, bracing it securely so it stays perfectly plumb.
- Mix your concrete so it’s thick—not runny—and pour it around the post. Stop about 2-3 inches below ground level.
- Finally, crown the footing. This means sloping the top of the wet concrete so it forms a small dome that sheds water away from the wood. This simple step is critical for protecting the post right at the ground line, where rot is most aggressive.
This hybrid approach gives you the rigidity of concrete and the superior drainage of gravel. If your property has unique challenges, like the rocky terrain common in New Haven County, a classic post and rail fence installed with these techniques provides an ideal mix of rustic style and serious durability.
Whether you're doing it yourself or hiring a crew, understanding these details is what protects your investment. It lets you ask the right questions and ensures your fence is built to stand strong from the ground up.
Applying Advanced Protective Barriers and Treatments

Even with the best wood and a perfect installation, there’s one more layer of defense you should seriously consider. This is where we bring in specialized barriers and treatments that create a physical shield right where it’s needed most.
We’re talking about the ground line, that critical zone where over 90% of rot happens. By creating an impenetrable barrier, you’re stopping the destructive combination of soil, moisture, and oxygen from ever reaching the wood. It’s an upfront investment that can transform a standard fence into a long-term asset, saving you thousands in future replacement costs.
Modern Post Protection Sleeves
In my experience, one of the most effective tools we have today is the modern post protection sleeve. These are heavy-duty sleeves, either heat-shrink or slip-on, that you apply to the base of the post before setting it.
The idea behind them is brilliantly simple. The sleeve forms a tough, waterproof, and airtight seal that separates the wood from the soil. This accomplishes two crucial things: it physically blocks moisture from getting into the wood, and it cuts off the oxygen supply that decay-causing fungi need to survive.
No moisture and no oxygen means no rot. It’s a straightforward, reliable method to safeguard your posts. And these aren’t just a new gimmick; their performance is backed by extensive scientific research.
Independent studies have consistently shown that post sleeves are incredibly effective. The table below summarizes findings from long-term field tests, demonstrating just how much of a difference this one step can make.
Effectiveness of Fence Post Protection Methods
| Protection Method | Study Duration | Key Finding | Estimated Lifespan Increase |
|---|---|---|---|
| Post Protection Sleeve | 20+ years | Zero decay found in protected posts, even in aggressive, fungus-rich soil. Unprotected posts showed severe rot. | 2.5 times or more |
| Shou Sugi Ban (Charring) | Centuries (Historical) | Creates a carbon layer that repels water and is naturally resistant to insects and fungi. | Varies, but can be 100+ years |
| Standard Pressure Treatment | 20+ years | Slows decay but remains vulnerable at the ground line without additional protection. | 15-20 years (baseline) |
As the data shows, physically separating the post from the ground is a game-changer. Sleeves not only prevent rot but also preserve the wood's internal treatments, reducing environmental leaching by an impressive 40-60%.
The Ancient Art of Shou Sugi Ban
If you prefer a more traditional, chemical-free route, the ancient Japanese technique of Shou Sugi Ban (also known as Yakisugi) is a fascinating and effective option. This method involves intentionally charring the surface of the wood with fire to create a natural, weather-resistant barrier.
Originally used for siding on temples and homes in Japan, the process works just as well for fence posts. The intense heat burns away the soft parts of the wood that fungi feed on. The resulting charcoal layer naturally repels water, making it incredibly difficult for moisture to penetrate.
This charred surface is also sterile and unappealing to insects and fungi. It's a beautiful example of ancient wisdom meeting modern needs. While barrier sleeves create an impermeable shield, Shou Sugi Ban fundamentally alters the wood itself to resist decay. As you can see, the science behind post protection offers compelling options for any project.
Putting These Advanced Methods to Work
Applying these barriers happens during the installation, so it’s a decision to make before you start digging. The little bit of extra work upfront pays off for decades.
For Post Sleeves:
- You’ll typically apply the sleeve to the bottom 24-30 inches of the post.
- The key is to position it so the seal extends about 2-4 inches above the ground or concrete collar.
- With heat-shrink sleeves, you use a basic propane torch to shrink the material tightly against the wood, creating a perfect, permanent bond.
For Shou Sugi Ban:
- This is a more hands-on process. You'll need a powerful torch to char the wood surface evenly.
- The goal is a deep, consistent "alligator skin" texture.
- After charring, you brush off the loose soot and typically seal the wood with a natural oil to finish it.
Whether you choose a modern sleeve or an ancient charring technique, you’re adding a dedicated line of defense against rot. You’re not just hoping the post will last—you’re ensuring it will.
A Proactive Inspection and Maintenance Schedule
Even a perfectly installed fence needs a little attention to last. Think of it as the cheapest insurance policy you can buy for your investment—a simple, routine check-up that helps you spot trouble long before it turns into a costly headache.
Just a couple of hours each year is all it takes to head off the slow, quiet damage that causes rot. The best time to do this is in the spring, right after the last of the snow melts and before summer plants start growing. This window gives you a clear view of any issues caused by winter moisture or shifting ground, letting you get your fence ready for the year ahead.
It’s also smart to roll this fence check into your other seasonal chores. For a bigger picture, you might find it helpful to look over these essential spring home maintenance tips that cover the rest of your property.
Your Spring Inspection Checklist
A good inspection is more than just a quick walk-by. You need to know what to look for, and the most critical area is right where the post meets the ground. Grab a screwdriver or a similar pointed tool—your best friend for this job—and walk the entire fence line, giving each post a moment of your attention.
Here's what we look for on a professional inspection:
- Probe for Soft Spots: The screwdriver test is a must. Gently but firmly push the tip into the wood right at the soil line. If it feels spongy or sinks in easily, you’ve found the first clear sign of rot. Healthy wood will feel solid.
- Check for Cracks and Splits: Scan each post for deep vertical cracks, especially any that travel down below the soil. These cracks act like small channels, funneling water straight to the core of the post where rot loves to start.
- Inspect for Insect Activity: Keep an eye out for small holes, piles of what looks like sawdust at the base of the post, or the bugs themselves. Termites and carpenter ants weaken the wood structure and create new pathways for moisture.
- Examine Post Stability: Grab the top of every post and give it a solid push. A healthy post won’t budge. If you feel a wobble or a significant give at the base, it's a major red flag that the footing has failed or the post has rotted through underground.
If you find a post that’s already badly damaged, it’s probably time for a professional opinion. While you can manage minor issues, advanced rot often requires a proper fix. You can learn more about our approach to these situations in our guide to fence repair services.
Maintaining Proper Drainage and Sealing
After your inspection, a little preventative work can make a world of difference. The goal is to keep the base of your posts as dry as possible.
Start by clearing out any debris that has built up against the wood. Rake away all the mulch, soil, grass, and packed leaves. This material holds moisture like a sponge, creating the exact damp conditions that rot thrives in. You want to maintain at least a few inches of clear space around the base of every post.
We recommend cleaning and re-sealing your wooden fence every 3 to 5 years. A good cleaning with a proper fence wash will get rid of grime and mildew. Following that up with a fresh coat of a high-quality, water-repellent stain or sealer is crucial for shielding the wood from both moisture and damaging UV rays.
This simple routine does more than just stop your fence posts from rotting; it keeps the whole fence looking sharp and standing strong. It’s a small investment of your time that pays off with years of extra durability and peace of mind.
Is It Worth Hiring a Professional Fence Installer?
Let's be honest, the DIY route for a new fence can look appealing. But building a fence that truly lasts through decades of Connecticut's weather is a different challenge. It takes more than a free weekend and a post-hole digger; it requires specialized gear, a deep knowledge of local soil and weather, and a mastery of the techniques we've discussed.
This is where you see the real difference a career fence installer makes. A professional job isn't just about getting the fence up—it's your single best defense against premature rot and failure. It ensures every detail, from the ground up, is done right the first time.
Putting All the Pieces Together
An experienced fence contractor doesn’t just install posts and panels. They build a complete system designed to last. Having served Connecticut communities since 2014, we've made this our standard practice. We take care of the small details so you don't have to.
Here’s what that looks like in practice:
- Smart Material Selection: We don't believe in a one-size-fits-all fence. We look at your specific property—whether you have the dense, heavy clay common in Middlesex County or face the salt-laced air of New Haven County—and recommend the right material for the job. That might be UC4B-rated pressure-treated lumber, zero-maintenance vinyl, or classic northern white cedar.
- Expert Installation Methods: Our crews dig below the frost line, every single time. Every post is set perfectly vertical and anchored with proven footing techniques, like a gravel base for drainage and a sloped concrete collar to shed water. This isn't just a good idea; it's how we build.
- Modern Protective Measures: We stay on top of the technology that actually works. That includes correctly applying modern solutions like post sleeves, which create an airtight and watertight barrier right where wood is most vulnerable: at the ground line.
We simply don't cut corners. Our reputation is built right alongside the fences we install, and we stand by our work.
The Proof Is in the Post
This focus on modern protection isn't just a hunch; it's backed by some serious science. Take, for example, a landmark 25-year field study by a respected independent timber testing body.
Around 1994, they began a study exposing treated wood posts to harsh, in-ground conditions. A quarter-century later, the results were undeniable: the posts protected with a total barrier sleeve showed zero decay. The unprotected posts? They rotted completely. You can see the 25-year research findings for yourself and look at the photos—it's pretty staggering.
This study confirmed what we've seen in the field for years: if you physically separate the wood from the soil, you stop rot. The sleeved posts had no fungal damage at that critical zone right at the ground line, which is where 90% of fence failures begin.
A true professional not only knows about these proven technologies but, more importantly, knows how to apply them correctly to get these results on your property.
Protect Your Investment with an Expert
A fence is a major addition to your property's security, curb appeal, and overall value. Why leave that investment to chance? Bringing in a dedicated, owner-operated company ensures it’s built to last from day one. An experienced local installer knows how to handle the unique challenges our state throws at us, from impossibly rocky soil to steep grades, ensuring your fence isn't just straight and level, but structurally sound for the long haul.
When you hire a pro, you're not just buying labor. You're investing in peace of mind, expert problem-solving, and a final product that will stand up to time and the elements. You're getting the assurance that every single technique to prevent fence post rot has been executed correctly, protecting your investment for years to come.
At Connecticut Fence Works, LLC, we build fences designed to endure. By blending time-tested techniques with our deep local experience, we create fences that are as durable as they are beautiful. If you're ready for a fence built the right way, get your free estimate today.